Saturday, August 28, 2010

Fall Classes

This fall I will be teaching six classes for Joggles they are as follows:

There are three corsage classes where I invite you to take a colorful journey into the realm of dyeing your own RTD (ready to dye) silk ribbons. I will teach you how to prepare your ribbons then dye them to create one of a kind, creative and colorful ribbons. These ribbons will then be turned into magical works of floral art for your own “corsages to dye for”!
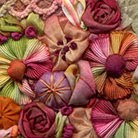
Corsages to Dye For I: Here we have the the Rose and Bud; Butterflies Delight; and the Harlequin flower. I will show you options on how to use each flower, from a single flower to a group of flowers.
Corsages to Dye For II: Here we have the Chou Rose, the Country Rose, and the Lady Ashley Rose. I will show you design options for each flower, from a single flower to a group of flowers.
*New* Corsages to Dye For III: Here we have the Violet, the Sweethearts Flower and the Sunflower and Rosette. I will show you design options for each flower, from a single flower to a group of flowers.
*New* Autumn’s Harvest: I absolutely love all of the rich autumn colors: chestnut, golden umber, warm maple, cinnamon and pumpkin. I have put together a few things that will help make your autumn decorations for your home more memorable. These are all soft sculpture items that are made from fabric or felt.
Ocean Rivers: This class will teach you a little bit about the freedom of expression the “free form peyote stitch” can bring to your technical repertoire. This is entirely beaded with seed beads and buttons.
*New* Scrumptious Hearts: Bits and pieces of cherished lace are melded with silk fabric to form a beautiful heart shaped base for your floral designed brooch. Chose from a few different heart shapes and ribbon worked floral vignettes, or create your own.

Joggles offers a wonderful way to learn, with teachers and students from all over the world. I have met and become with friends across the country and have met women from France, Belgium, Australia and Canada. The on-line classes are held once a week and repeat once a week for as long as the class runs. Students receive a link to down load their handout on the first day of the lesson then have the opportunity to ask questions and connect with other students in an on-line forum.

I hope that you find something here that you will find interesting! Happy Stitching!

Christen


Saturday, April 24, 2010

New Spring Session Classes for Joggles

I have been busy working on my classes for the Spring Session at Joggles, here is the line-up:

Corsages to Dye for II: May 25, 2010/three lessons

Do you find yourself wishing “if only I had a ribbon that was this color or that”, or “why didn’t it come in my favorite colors”? If your answer is YES, then let me invite you to take a colorful journey into the realm of dyeing your own RTD (ready to dye) ribbons. I will teach you how to prepare your ribbons then dye them to create one of a kind, creative and colorful ribbons. These ribbons will then be turned into magical works of floral art for your own “corsages to dye for”!

Scrumptious Scraps: June 11, 2010/5 lessons

Scrumptious bit and pieces of vintage laces are melded and stitched together to form a unique and beautiful base for your creative stitched designs. Once the lace scraps are turned into a base, I will show you how to dye the base and a variety of ribbons that can be later used in the embroidery and ribbon worked vignettes.

Flora Dora and Daisy Chain RAW Bracelets: Two for One! June 22, 2010/3 lessons

Do you have a wonderful stash of buttons and beads that are just waiting for the right project to come along? Well consider these beaded and buttoned up bracelets, which are made using two different Right Angle Weave techniques. The first bracelet simple and elegant the other feminine and charming; both take only a short amount of time to make.

Beadazzled Somemore Purse: July 6, 2010/4 lessons

This class delves deeply into the wonderful world of bead embellishment, exploring a wide variety of stitches and embroidery techniques. The sample that you will be stitching on can become a purse (using the pattern provided), a pillow or wall hanging, or whatever you choose. The techniques that will be covered are free-form peyote on fabric, free form bead embroidery, multi bead embroidery, attaching trinkets, buttons and charms with beads, and so much more. Your project will start with a beautiful batik fabric, a variety of seed beads in several sizes and colors combined with a collection of buttons, glass charms and larger beads. This class is a must for anyone who loves beads!

BEBE: Beginning Embroidery with Bead Embellishment: July 23, 2010/4 lessons

This is a great introductory class to traditional embroidery stitches with the added flare and dazzle that only seed beads can add. These stitches can be incorporated in any fiber design that you choose, whether it be an already stitched crazy quilted block, a strip pieced pillow top, or an appliquéd art quilt block. A variety of stitches are used in each separate embroidered design, a Base Stitch, a Design Stitch, and an Embellished Stitch. Additional embellishments will also be covered such as adding in buttons, sequins, large beads and charms.

The classes at Joggles are brought to you in a file/document format. The classes can run between three-five lessons, with a week between lessons. Joggles provides an online Forum format where teachers and students can communicate, ask questions, or show off their examples from class. I am a very dedicated teacher, and I want each student to be able to complete the project/s covered in the classes. I prepare each lesson’s document with photographed step-by-step pictures and detailed written instructions.

For a more detailed description of each lesson please visit my page at Joggles.

I hope to see you there! Enjoy- Christen

Wednesday, March 3, 2010

Reminder: New Winter Session Classes

We are just wrapping up the Jardin de Grandmere class this week and I still have two more classes left in the Winter Session for Joggles.com.

Class: Ocean Rivers Start Date: Friday March 12 12, 2010 Cost: $45/4 lessons
This class will teach you a little bit about the freedom of expression the “free form peyote stitch” can bring to your technical repertoire. The launching point of your bracelet and your creative explosion will start with a simple grosgrain ribbon, a small collection of buttons, a variety of seed beads in several sizes and colors combined with a few small treasures. Bring your imagination and creative spirit…


Class: Corsages to Dye For Start Date: Tuesday March 30 2010 Cost: $35/3 lessons
Have you ever wished that you could dye your own ribbon, in the colors that you like the best? Using simple techniques, I will teach you how to create truly intriguing and colorful patterns with your dyes and ribbon. These ribbons will then be turned into magnificent works of art that you create by stitching petals and leaves for your own “corsages to dye for”!
Hope that you can make it! Christen

Friday, February 26, 2010

Things that "R GOOD 2 KNOW": Celluloid Buttons

Celluloid was invented in the 1870’s and was one of the first and most versatile of the man-made plastics. Even though celluloid is a thinner material than Bakelite some of the same techniques could be used to create items such as molding, stamping and machine tooling. Both celluloid and Bakelite plastics were used to make buttons, jewelry and other household items such as cutlery, telephones, bathroom essentials and more.

Today we will talk about the celluloid button, as you can see in the necklace “Deco Drama”, I really love celluloid buttons! The base of the necklace is a vintage French ombre ribbon, ruched, with a silk cord stitched for the tie. As you can see celluloid was definitely the theme here, using many of my favorite types of celluloid button: molded, tight-tops, French Ivory, glow bubbles, buffed and pierced.

Celluloid was a thinner plastic, and detailed shapes could also be created by pulling, hollow blowing, and extruding. The coloring of the celluloid button was often more diverse than that of the autumn and vibrant coloring of the Bakelite buttons.

This bracelet is made using vintage glass,celluloid and Bakelite buttons; these are stitched to a base of grosgrain ribbons and an old measuring tape.

Here are a series of bracelets that feature vintage celluloid, Bakelite and glass buttons. I made these using simple sewing techniques and materials so that the buttons would shine as the stars that they are!
  • The first bracelet base is vintage picot edged grosgrain ribbon. The buttons that I used are celluloid “glow bubbles”, tight-tops and a few brown Bakelite.
  • The second bracelet base is vintage cotton grosgrain ribbon. The heart shaped buttons are Bakelite and the cream colored buttons are celluloid.
  • The third bracelet base is taffeta ribbon with a strip of grosgrain ribbon stitched down the center. The incredible green buttons are vintage celluloid “glow bubbles” and the black buttons are carved celluloid.
The versatility of celluloid made it extremely popular with button and clothing manufacturer’s, however the serious drawback to this material was that it is flammable! For further reading may I suggest a book I use frequently: Button Button Identification & Price Guide by Peggy Ann Osborne.

These buttons should not be stored in a closed glass or metal container because the fumes from the components that create the plastic will smell. Celluloid has a tendency to become brittle, so do not put these buttons in the dryer. If you need to clean celluloid try rubbing with a soft cloth or an old toothbrush to remove debris and to polish the surface. Celluloid buttons can have a variety of shanks such as self and metal; you will find many other plastics have celluloid shanks glued to the button because it was a less expensive material.

Thank you for letting me share somethings that "R GOOD 2 KNOW" with you. Christen


Monday, February 15, 2010

And The Winner IS.......


And the winner is: Bluebird and Elizabeth, @ alterbooklover.com Yeah to you!

I want to share my profound thanks to Lisa the whimsicalbohemian, for organizing this wonderful event. I enjoyed flying around the airwaves visiting people in far away countries, in my country and even in my own state.

Thank you to each and everyone who flew their magic carpet to my doorstep, and each and everyone who left wonderful, encouraging and creative comments!

Take care each of you, even though the ride is over, I will still stop by and say hi through the year, and look forward to seeing you next year.

Much love, Christen

PS: I do have a few of these pincushions left in my Etsy store, if you want to take a stop over and see them!

Friday, January 29, 2010

One World One Heart Give Away


Welcome to all of my regular visitors and you new visitors as well! I am participating in the One World One Heart world-wide "Give Away" that is sponsored by Lisa A Whimsical Bohemian. This event is open to all people who have an active blog. The event, created in 2007 was with the original idea to bring bloggers together from around the world who may never ordinarily meet and to discover new and wonderful people, and in the process possibly win a prize or two.

This pincushion is what I am offering as my free gift here, and is made from vintage feed sack material.

To take part in the drawing you must have an active blog to enter to win this prize. If you wish to enter in this drawing, all you need to do is leave me a comment with a link back to your blog or an email address in order for me to get in touch with you if you win! Then I will ship your pincushion to you, where ever you live!

This event runs through Feb 14 (midnight Pacific time), and winners will be announced on February 15. Good luck to you, enjoy your journey on the magic carpet and may you find new and wonderous blogs to inspire and bring you joy! Thank you for taking the time to visit my blog!

Christen

PS: I will also be giving away a goodie on my other blog: Christen's Creations pop on over for a visit!

Monday, January 4, 2010

New Winter Session Classes

I will be teaching three classes this coming Winter Session for Joggles.com.

Jardin de Grandmere is the first class and will begin February 23, 2010. The price is $22.00 for two lessons.

Elegant and pretty is the best description for this bracelet. The flower medallion is created with a circular peyote stitch. These circular peyote medallions reminded me of the “Grandmother’s Garden” quilt block. When looking at fabric yo-yos stitched in floral seed sacks or vintage cottons, I imagined a garden of beaded flowers. The dimension is created by using three different sizes of seed beads. The stitch can be used to create a single or double row of flowers, with a beautiful button closure to finish off your bracelet.

Lesson 1: In the first class you will learn the basic circular peyote stitch that each flower medallion is made with. I will give you several examples of color combinations, and then will leave you to play.

Lesson 2: In this class I will show you how to add a second row of flower medallions to your bracelet (if you so desire), and how to attach your button and loop closure in order to finish your bracelet.

Ocean Rivers is the second class and it will begin March 12. The price is $45.00 for four lessons.

This class will teach you a little bit about the freedom of expression the “free form peyote stitch” can bring to your technical repertoire. The launching point of your bracelet and your creative explosion will start with a simple grosgrain ribbon, a small collection of buttons, a variety of seed beads in several sizes and colors combined with a few small treasures. Bring your imagination and creative spirit….

Lesson 1: You will cut and prep the ribbon base; we will talk about setting up your beads; learn about focal placement and the stitching the buttons in place; then create your first tidal currents.

Lesson 2: We will explore the basic peyote stitch; changing from between bead sizes within the current; making connections and creating more tidal currents; and adding in new thread.

Lesson 3: We will cover creating waves along the outer reaches of the bracelet; stitching in the tidal pool treasures such as larger beads, sequins and chips with single bead stoppers, cascades and picots.

Lesson 4: Finishing touches: stitching the button and closure loop; stitching the beaded shell edging; and barnacle extras.

Corsages to Dye For: Series 1 is the last class and will begin March 30. The price is $35.00 for three lessons.

Have you ever wished that you could dye your own ribbon, in the colors that you like the best? Using simple techniques, I will teach you how to create truly intriguing and colorful patterns with your dyes and ribbon. These ribbons will then be turned into magnificent works of art that you create by stitching petals and leaves for your own “corsages to dye for”!

Lesson 1: In the first class you will learn how to mix the dyes using a basic color wheel; learn a series of techniques to prepare the ribbon for dyeing; then actually dyeing the ribbons that you will use in the next lessons.

Lesson 2: The second class will focus on making the flowers: the rose and bud; the bachelor button; and the passion-flower. I will show you options on how to use each flower, from a single flower to a group of flowers; how many you make of each flower is up to you.

Lesson 3: The third lesson will focus on making the leaves from the ribbons that you dyed, then stitching all of the components together for each corsage. Additional commercially made ribbons can also be used, and can add another dimension to your corsages such as the velvet ribbon I used in the Bachelor Button Corsage.

The classes handouts are emailed to you the day of the class, with a week to review and complete that week’s lesson. The following lesson/s will arrive a week later with another handout and further instructions. There is an on-line forum for the student and teacher connect or contact in case there are any questions.

Enjoy and keep it creative! Christen