Well it is that time of year again! New samples have been made, old favorites have returned, and the schedule has been set! Here is what I will be offering at Joggles.com this fall.
*NEW* Beadoodlery 2 lessons/$25.00 beginning September 20, 2011.

This is an excellent beginning class to learn about beads, free-form stitched bead embroidery, with a step-by-step illustration of the design process. In Beadoodlery you will stitch beads onto to a fabric base to create a “doodled” bead pattern. I will provide 4 different heart shapes, though you can chose any design you like for the base.
*Returning Favorite* Jardin de Grandmere 2 lessons/$22.00 beginning September 23, 2011

Elegant and pretty is the best description for this bracelet. The flower medallion is created with a circular peyote stitch. These circular peyote medallions reminded me of the “Grandmother’s Garden” quilt block. When looking at fabric yo-yos stitched in floral seed sacks or vintage cottons, I imagined a garden of beaded flowers. The dimension is created by using three different sizes of seed beads. The stitch can be used to create a single or double row of flowers, with a beautiful button closure to finish off your bracelet.
*Returning Favorite* Creative Thread Embroidery 3 lessons/$35.00 beginning October 4, 2011

Explore the possibilities and broaden your creative stitched repertoire to add to your CQ and other embroidery projects. We will work the embroidery stitches using a variety of threads such as pearl cotton; buttonhole twist; rayon and cotton floss on a fabric base that you can use later as needle case.
Some stitches will blend thread to create new colors and textures. The dimensional embroidery stitches that will be covered are bullion knot, cast on buttonhole, drizzle, woven, whipped and tatted. Traditional stitches such as the buttonhole, chain stitch, feather stitch, feather stitch leaf, French knot, lazy daisy, pistol stitch and straight stitch will be also covered.
* NEW* A Crazy Lady’s Guide to Embellishing 4 lessons/$45.00 beginning October 6, 2011

Do you have a crazy pieced block or quilt top perhaps from A Crazy Lady’s Guide to Piecing that is just waiting to be encrusted with embroidery, ribbonwork, and embellishment? In this class I will cover many techniques that you can use to create a unique and beautiful heirloom piece that will be passed down from family member to member. Please note that there will be no instructions to make or finish the block or quilt.
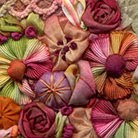
*Returning Favorite* Scrumptious Hearts 3 lessons/$38.00 beginning October 7, 2011

Bits and pieces of cherished lace are melded with silk fabric to form a beautiful heart shaped base for your floral design. Chose from a few different heart shapes and ribbon worked floral vignettes, or create your own. The melded silk and lace base and the RTD silk ribbons for the ribbon work flowers and the silk ribbon embroidery are dyed with the Colorhue dyes. This is an excellent way to use up small amounts of this and that to form an heirloom brooch to be treasured.
*NEW* Kelp Scarf 2 lessons/$20.00 beginning October 25, 2011

In class you will make stitched “mesh” from strips and scraps of fabric, decorative yarns, ribbons and metallic or rayon threads. The result will be a lightweight, colorful scarf that can be worn all year round.
*NEW* Beadazzled Stitches 4 lessons/$45.00 beginning November 4, 2011

Do you love embroidery? Have you ever embroidered with beads? This is the perfect class for you to learn how to combine these two techniques. I will give you directions to make a simple strip-pieced base made from batik fabrics or if you have a CQ base already made you can work on that in class. This class takes you on a journey that explores beads, embroidery and other embellishments.
*NEW* Silk Ribbon Brooches 2 lessons/$20.00 beginning November 8, 2011

This class is a great introduction to silk embroidery ribbons, buttonhole twist, decorative threads and a few basic embroidery stitches. Make this lovely little brooch from one of the three different shapes and garden designs to give as a gift or to keep for your self. The embroidery stitches that will be covered are the woven rose, feather stitch, chain stitch, lazy daisy, and French knot.
*NEW* Fabuloucious Felt Florals 2 classes/$25.00 beginning November 22, 2011

These fast and easy flowers are just fun, fun, fun! Create a brooch, hair ornament, or decorate an object with these colorful, creative floral beauties. Several different flowers, leaves and embellishments will be made using a variety of shapes with the addition of machine and hand embroidery.


